Setup Instructions for MySQL Database
Setup Instructions for MySQL Database
This subtopic instructions and essential notes on how to set up a MySQL database and configure it for integration with Daton.
Set up on MySQL
Task 1: Set up Your MySQL Database
MySQL is a free and open-source relational database management system (RDBMS) that can be installed on a variety of platforms, including Linux, Microsoft Windows, and macOS.
You can either set up a MySQL database on your machine or use an AWS EC2 instance to set up a MySQL database that can integrate with Daton
Note: The steps below are just for reference. You can use other methods to set up your MySQL database or consult the MySQL documentation for more detailed instructions.
Once you have completed setting up a MySQL database using either of the methods or any other method, you need to perform the following steps to integrate your MySQL database with Daton:
- Create a dedicated user in the MySQL database.
- Allow remote connections to the MySQL database.
- Perform the required configuration in your MySQL Database to integrate it with Daton. See Task 2: Configure Your MySQL Database for Daton.
Additional Notes:
- You can use a MySQL GUI tool, such as MySQL Workbench, to simplify the process of setting up and managing your MySQL database.
- If you are using an AWS EC2 instance to set up your MySQL database, you can create a security group to control access to the database.
- It would help to regularly back up your MySQL database to protect your data from loss or corruption.
Set up a MySQL Database on Your Machine
For more detailed information on setting up a MySQL database on your machine, refer to the MySQL documentation: Installing and Upgrading MySQL.
Perform the following steps to set up a MySQL database on your machine:
- Download and install the MySQL server on your machine.
- On Linux, use the package manager such as apt and yum
- For more detailed information, refer to the following MySQL documentation:
- Installing MySQL on Linux
- For Yum-based Linux distributions like Oracle Linux, Red Hat Enterprise Linux, and Fedora, see A Quick Guide to Using the MySQL Yum Repository.
- For APT-based distributions like Debian and Ubuntu, see A Quick Guide to Using the MySQL APT Repository.
- For more detailed information, refer to the following MySQL documentation:
- On Windows, download the installer from https://dev.mysql.com/downloads/installer/
- For more detailed information, refer to the following MySQL documentation: Installing MySQL on Microsoft Windows.
- On macOS, use Homebrew or the DMG installer
- For more detailed information, refer to the following MySQL documentation: Installing MySQL on macOS
- On Linux, use the package manager such as apt and yum
- Start the MySQL server: For more information, refer to the following MySQL documentation: Starting the Server
- On Linux/macOS, use
sudo systemctl start mysql - On Windows, start the service from the services panel
- On macOS, use
mysql.server start
- On Linux/macOS, use
- Run security script to set root password and remove anonymous users
mysql_secure_installation - Create a new MySQL database
CREATE DATABASE mydatabase; - Verify the database is created
SHOW DATABASES;
Steps to Create a Dedicated User in the MySQL Database
It's best practice to create a separate user instead of using the root user. Perform the following steps:
- Log in to MySQL console as root
sudo mysql -u root -p - Create a new user
CREATE USER 'myuser'@'localhost' IDENTIFIED BY 'password';
Note: Replace myuser with the name of the user you want to create localhost with the hostname of the server where the database is located, and password with the password for the user. - Grant privileges to the user
GRANT ALL PRIVILEGES ON mydatabase.* TO 'myuser'@'localhost'; - Flush privileges
FLUSH PRIVILEGES;
A dedicated user has now been created.
Steps to Allow Remote Connections to the MySQL Database
By default, MySQL only allows local connections. To allow remote connections to a MySQL database, you need to edit the mysqld.cnf file.
- Edit
/etc/mysql/mysql.conf.d/mysqld.cnf.- The
mysqld.cnffile is located in theetc/mysqldirectory on most Linux systems. To edit themysqld.cnffile, open it in a text editor.
- The
- Navigate to the line that begins with the bind-address directive and add the following line. This line will tell MySQL to listen for connections on all interfaces.
bind-address = 0.0.0.0 - Restart the MySQL server
sudo systemctl restart mysql - Change user plugin: This step is used to change the authentication plugin for a MySQL user account. The authentication plugin is used to authenticate the user when they connect to the MySQL server.
- Check the user plugin with
SELECT user, plugin, host FROM mysql.user; - If necessary, change the user plugin
RENAME USER 'username'@'localhost' TO 'username'@'%';
- Check the user plugin with
- Flush privileges
FLUSH PRIVILEGES;
Open port 3306: Assuming you’ve configured a firewall on your database server, you must also open port 3306 to allow traffic to MySQL.
Set up a MySQL Database Using an AWS EC2 Instance
When you set up a MySQL database on your machine, you are responsible for all aspects of the database's installation, configuration, and maintenance. This includes installing the MySQL software, creating the database and database users, granting privileges to users, and backing up the database.
AWS handles many tasks when you use an AWS EC2 instance to set up a MySQL database. You need to launch an EC2 instance and select the MySQL AMI. AWS will install the MySQL software and configure the database for you. You will still need to create the database and database users and grant privileges to users. However, AWS will automatically back up the database for you.
There are many advantages to using an AWS EC2 instance to set up a MySQL database, including:
- Control and flexibility: You have complete control over all aspects of the database, including the hardware, software, and configuration. This gives you the flexibility to tailor the database to your specific needs.
- Scalability: You can easily scale your database up or down as needed by launching or terminating EC2 instances. This is especially useful for applications with variable workloads.
- Reliability: AWS EC2 instances are highly reliable and offer various features to improve your database's reliability, such as high availability zones and elastic block store (EBS) volumes.
- Security: AWS EC2 instances offer a variety of security features to protect your database, such as firewalls, intrusion detection systems, and access control lists.
- Cost-effectiveness: AWS EC2 instances can be very cost-effective, mainly if you use spot instances or reserved instances
In addition to these general advantages, there are also some specific advantages to using AWS EC2 instances to set up a MySQL database, such as:
- Easy setup and management: AWS provides a variety of tools and services to make it easy to set up and manage a MySQL database on an EC2 instance. For example, you can use the AWS Launch Wizard to launch an EC2 instance with a MySQL database pre-installed.
- Integration with other AWS services: AWS offers a variety of other services that can be integrated with MySQL, such as Amazon Relational Database Service (RDS), Amazon Aurora, and Amazon Redshift. This allows you to build complex database solutions that meet your specific needs.
Prerequisites
To set up a MySQL database using an AWS EC2 instance, you need an AWS account with access to launch EC2 instances.
AWS Documentation Reference Links:
- Creating and connecting to a MySQL DB instance
- Amazon Elastic Compute Cloud Documentation
- Controlling access with security groups
- Create an Amazon RDS DB instance
- Create and Connect to a MySQL Database with Amazon RDS
Steps to Set up a MySQL Database on AWS EC2
Perform the following high-level steps to launch an EC2 instance and set up a MySQL database:
- Launch an EC2 instance using a MySQL-compatible AMI: You can launch an EC2 instance using the AWS Management Console or the AWS CLI.
- Install MySQL Server on the EC2 instance: You can install MySQL Server on the EC2 instance using the Amazon Systems Manager (SSM) or the AWS CLI.
- Create a MySQL database: Once MySQL Server is installed on the EC2 instance, you can create a MySQL database using the CREATE DATABASE statement.
- Create a MySQL user: You must create a MySQL user to access the database. You can create a MySQL user using the CREATE USER statement.
- Grant privileges to the MySQL user: You will need to grant the MySQL user the necessary privileges to access and modify the database. You can grant privileges using the GRANT statement.
- Flush the privileges: You must flush the privileges table to ensure that the changes you made to the privileges take effect. You can flush the privileges using the FLUSH PRIVILEGES statement.
- Allow remote connections: MySQL only listens for connections on the local loopback interface by default. To allow remote connections to a MySQL database, you need to edit the mysqld.cnf file. The mysqld.cnf file is located in the etc/mysql directory on most Linux systems. After you have edited the mysqld.cnf file, save it, and restart the MySQL server.
- Test the connection: You can test the connection to your MySQL database using the MySQL command-line client.
Example: Set up a MySQL database using an AWS EC2 instance using the AWS Management Console.
- Go to the AWS Management Console and sign in.
- Search for and select EC2.
- Click Launch Instance.
- Select a MySQL-compatible Amazon Machine Image (AMI) for your EC2 instance. For example, you can select Amazon Linux AMI.
- Configure your EC2 instance and click Launch Instances.
- Once your EC2 instance is running, connect to it using an SSH client.
- You can use an SSH client like PuTTY to connect to your EC2 instance.
- Update the package manager
sudo yum update - Install MySQL Server using the yum package manager
sudo yum install mysql-server - Start MySQL Server
sudo service mysqld start - Secure MySQL Server: Run the security script to set the root password and remove anonymous users
sudo mysql_secure_installation - Create a MySQL database
mysql -u root -p
CREATE DATABASE my_database; - Create a dedicated MySQL user
CREATE USER my_user IDENTIFIED BY 'my_password'; - Grant privileges to the MySQL user and flush privileges
GRANT ALL PRIVILEGES ON my_database.* TO my_user;FLUSH PRIVILEGES; - Modify MySQL's bind address to allow connections from other hosts
sudo vi /etc/mysqld.cnf
# Change bind-address to:bind-address = 0.0.0.0
Note: Contact AWS support for assistance if you cannot modify the MySQL configuration files. - Restart MySQL to apply the changes
sudo systemctl restart mysqld - Change user plugin: This step is used to change the authentication plugin for a MySQL user account. The authentication plugin is used to authenticate the user when they connect to the MySQL server.
- Check the user plugin with
SELECT user, plugin, host FROM mysql.user; - If necessary, change the user plugin
RENAME USER 'username'@'localhost' TO 'username'@'%';
- Check the user plugin with
- Flush privileges
FLUSH PRIVILEGES;
The MySQL server is now installed and secured on the EC2 instance. Make sure to restrict access to the EC2 instance and MySQL server to trusted sources for security. To do this, you can use a number of methods, such as:
- Security groups: Security groups are a firewall that controls inbound and outbound traffic to your EC2 instances. You can create a security group that allows access to port 3306 from only specific IP addresses, such as your own IP address or the IP address of your office network. See Configure Security Groups.
- SSH keys: SSH keys are a more secure way to connect to your EC2 instances than using passwords. To use SSH keys, you will need to generate an SSH key pair and then add the public key to your EC2 instance's security group.
- VPN: A VPN can be used to create a secure tunnel between your computer and your AWS VPC. This allows you to access your EC2 instances and MySQL server without exposing them to the public internet.
Configure Security Groups
Perform the following high-level steps to configure security groups to allow MySQL traffic for a MySQL database on AWS EC2.
- Create a security group for the MySQL database.
- Allow inbound TCP traffic on port 3306 from the IP addresses or security groups of the clients that will be connecting to the database.
- Assign the security group to the EC2 instance running the MySQL database.
Example: Steps to create a security group for a MySQL database using the AWS Management Console.
- Go to the EC2 console and click Security Groups.
- Click Create Security Group.
- Enter a name and description for the security group.
- Click Add Rule.
- Select TCP from the Protocol drop-down list.
- Enter 3306 in the Port Range field.
- Select Anywhere from the Source drop-down list.
- Click Save.
Once you have created the security group, you need to allow inbound TCP traffic on port 3306 from the IP addresses or security groups of the clients that will be connecting to the database. To do this, perform the following steps:
- Select the security group that you created in the previous step.
- Click Edit.
- Click Add Rule.
- Select TCP from the Protocol drop-down list.
- Enter 3306 in the Port Range field.
- Select the IP addresses or security groups of the clients that will be connecting to the database from the Source drop-down list.
- Click Save.
Finally, you must assign the security group to the EC2 instance running the MySQL database. To do this, perform the following steps:
- Go to the EC2 console and click Instances.
- Select the EC2 instance that is running the MySQL database.
- Click Actions > Change Security Groups.
- Select the security group (that you created in the previous step) from the Available security groups list.
- Click Add Security Group.
- Click Apply.
After you have completed these steps, your MySQL database will be accessible to the clients that you specified in the security group rules.
Additional Notes:
- Give the security group a relevant name related to its purpose, such as sg-mysql-prod-db.
- Add a description of the security group rules and purpose.
- Specify TCP port 3306 explicitly in the inbound or outbound rules.
- For security reasons, it is essential to restrict access to the MySQL database to only the clients that need it. It would help if you also used strong passwords for all MySQL users.
Test the Connection
To test the connection to the MySQL database, run the following command:
mysql -u my_user -p -h <your_ec2_instance_public_ip>
-
-u my_user: Specifies the MySQL user to connect with. -
-p: Prompts the user for the MySQL user's password. -
-h <your_ec2_instance_public_ip>: Specifies the public IP address of the EC2 instance where the MySQL database is running.
If you can connect to the MySQL database, then you have successfully set up a MySQL database using an AWS EC2 instance, and you will be prompted for the MySQL user's password. After you enter the password, you will be logged into the MySQL database.
Task 2: Configure Your MySQL Database for Daton
To configure the MySQL database for integrating it as a destination with Daton, perform the following steps:
- Edit the mysqld.cnf file
- Open the mysqld.cnf file in a text editor.
- Add the following parameters to the end of the file
wait_timeout = 600interactive_timeout = 600connect_timeout = 300bind-address = 0.0.0.0mysqlx-bind-address = 127.0.0.1local-infile=1
Save and close the mysqld.cnf file. These settings increase timeout values, allow remote connections, and enable the loading of local data files.
- Restart the MySQL server for the changes to take effect
service mysql restart - Enable local_infile
- Check the status of local_infile
SHOW GLOBAL VARIABLES LIKE 'local_infile';
The output of the command should show that local_infile is set to ON. - Enable local_infile if it is not enabled
SET GLOBAL local_infile = true;
- Check the status of local_infile
- Flush privileges
FLUSH PRIVILEGES;
Your MySQL database is now ready for integration with Daton.
The local_infile variable allows you to load data into MySQL tables from local files. This is required for Daton to be able to replicate data from your MySQL database.
The steps laid out above are a pre-requisite before you start configuring MySQL as a destination in Daton.
Set up on Daton
1. Log in to your Daton account and navigate to the Destinations page.
2. Click the Add New Destination button and select MySQL from the list of options.
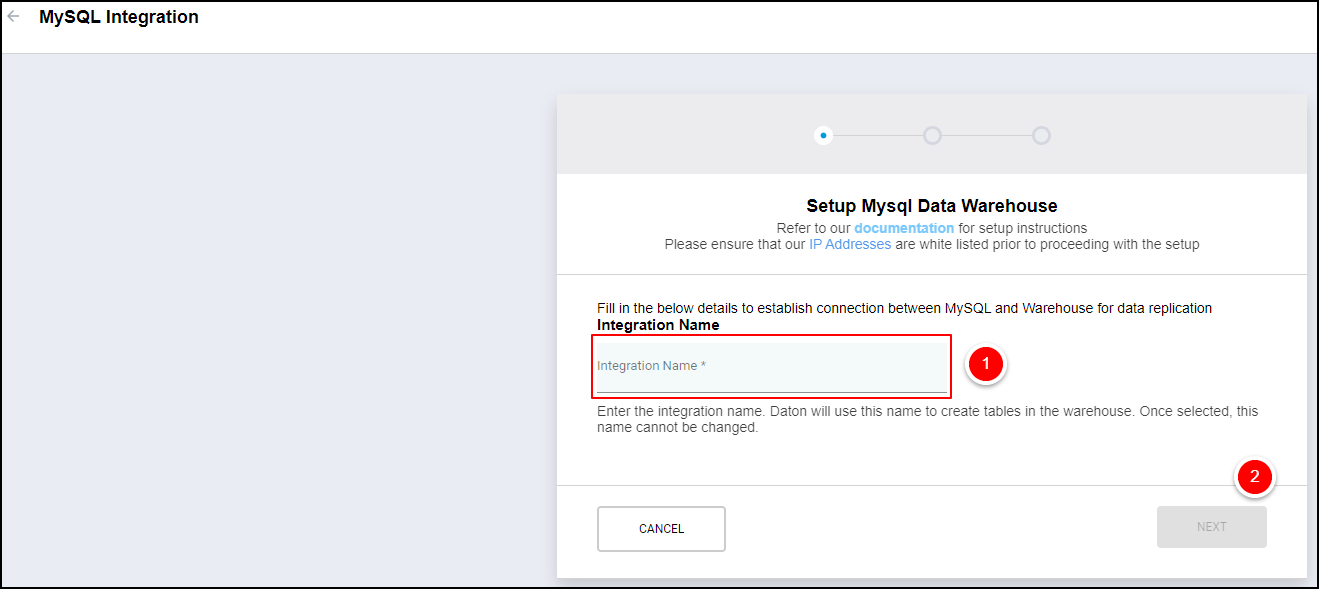
3. Enter the Integration Name and click Next. A unique name for your MySQL integration. This name will be used to create tables in the data warehouse and cannot be modified later.
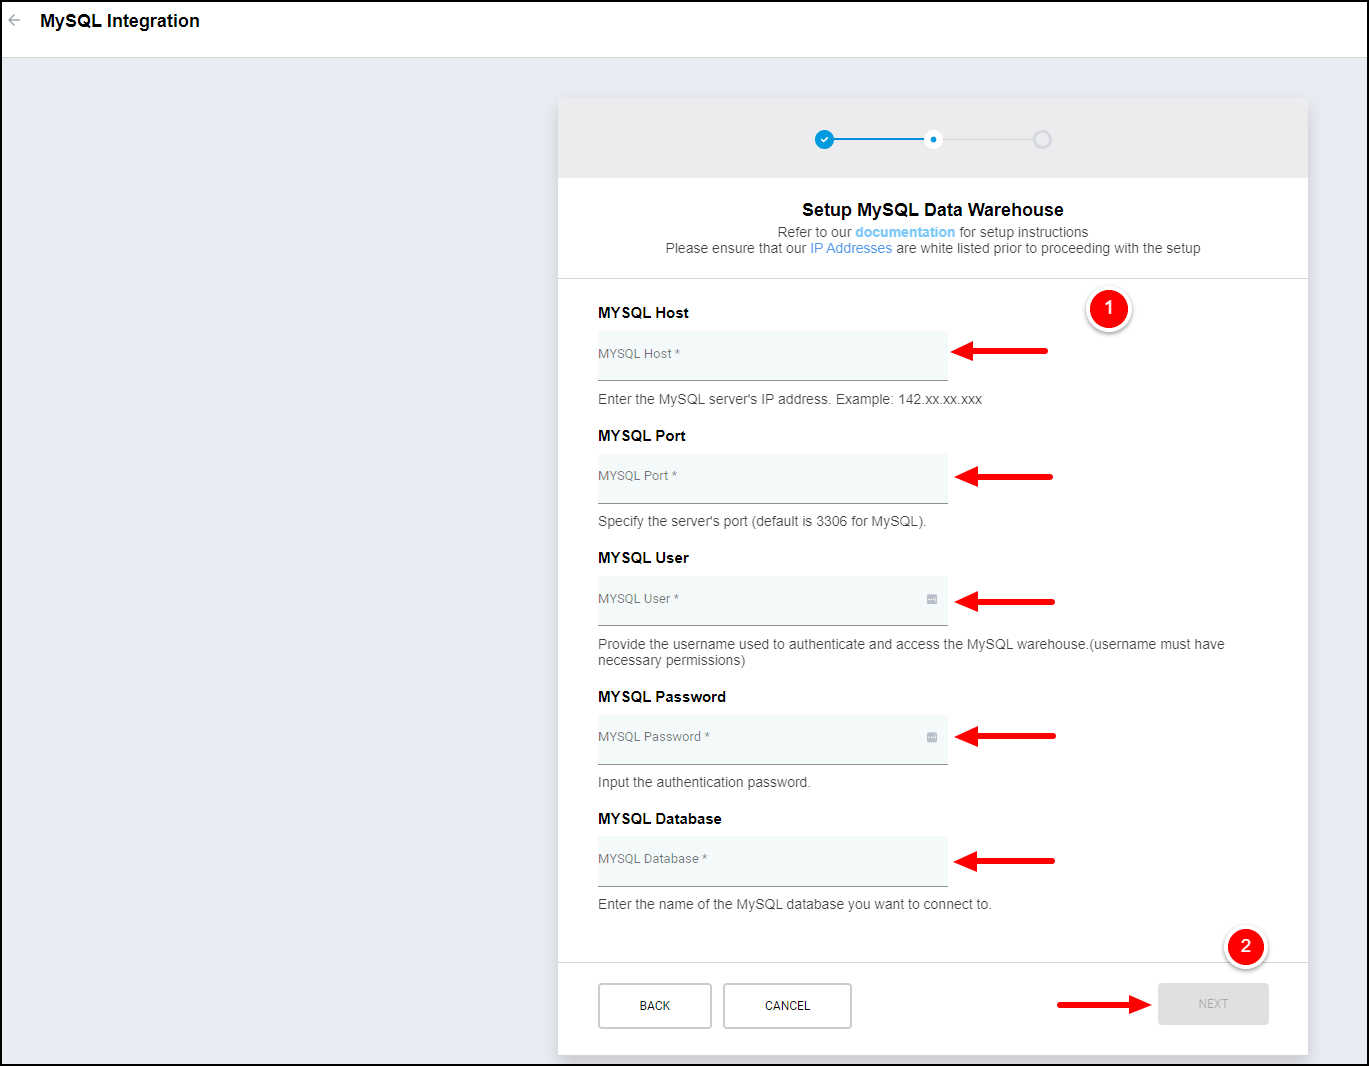
4. Enter the following details to configure the connection to your MySQL database and click Next.
- MySQL Host: The IP address or hostname of the MySQL server.
- MySQL Port: The port number of your MySQL server. The default port is 3306.
- MySQL User: The username provided for the dedicated user with access to the database.
- MySQL Password: The password provided for the MySQL user.
-
MySQL Database: The name of the MySQL database you want to connect to.
5. Select the Schema of your choice and click Submit. A message will confirm successful integration.
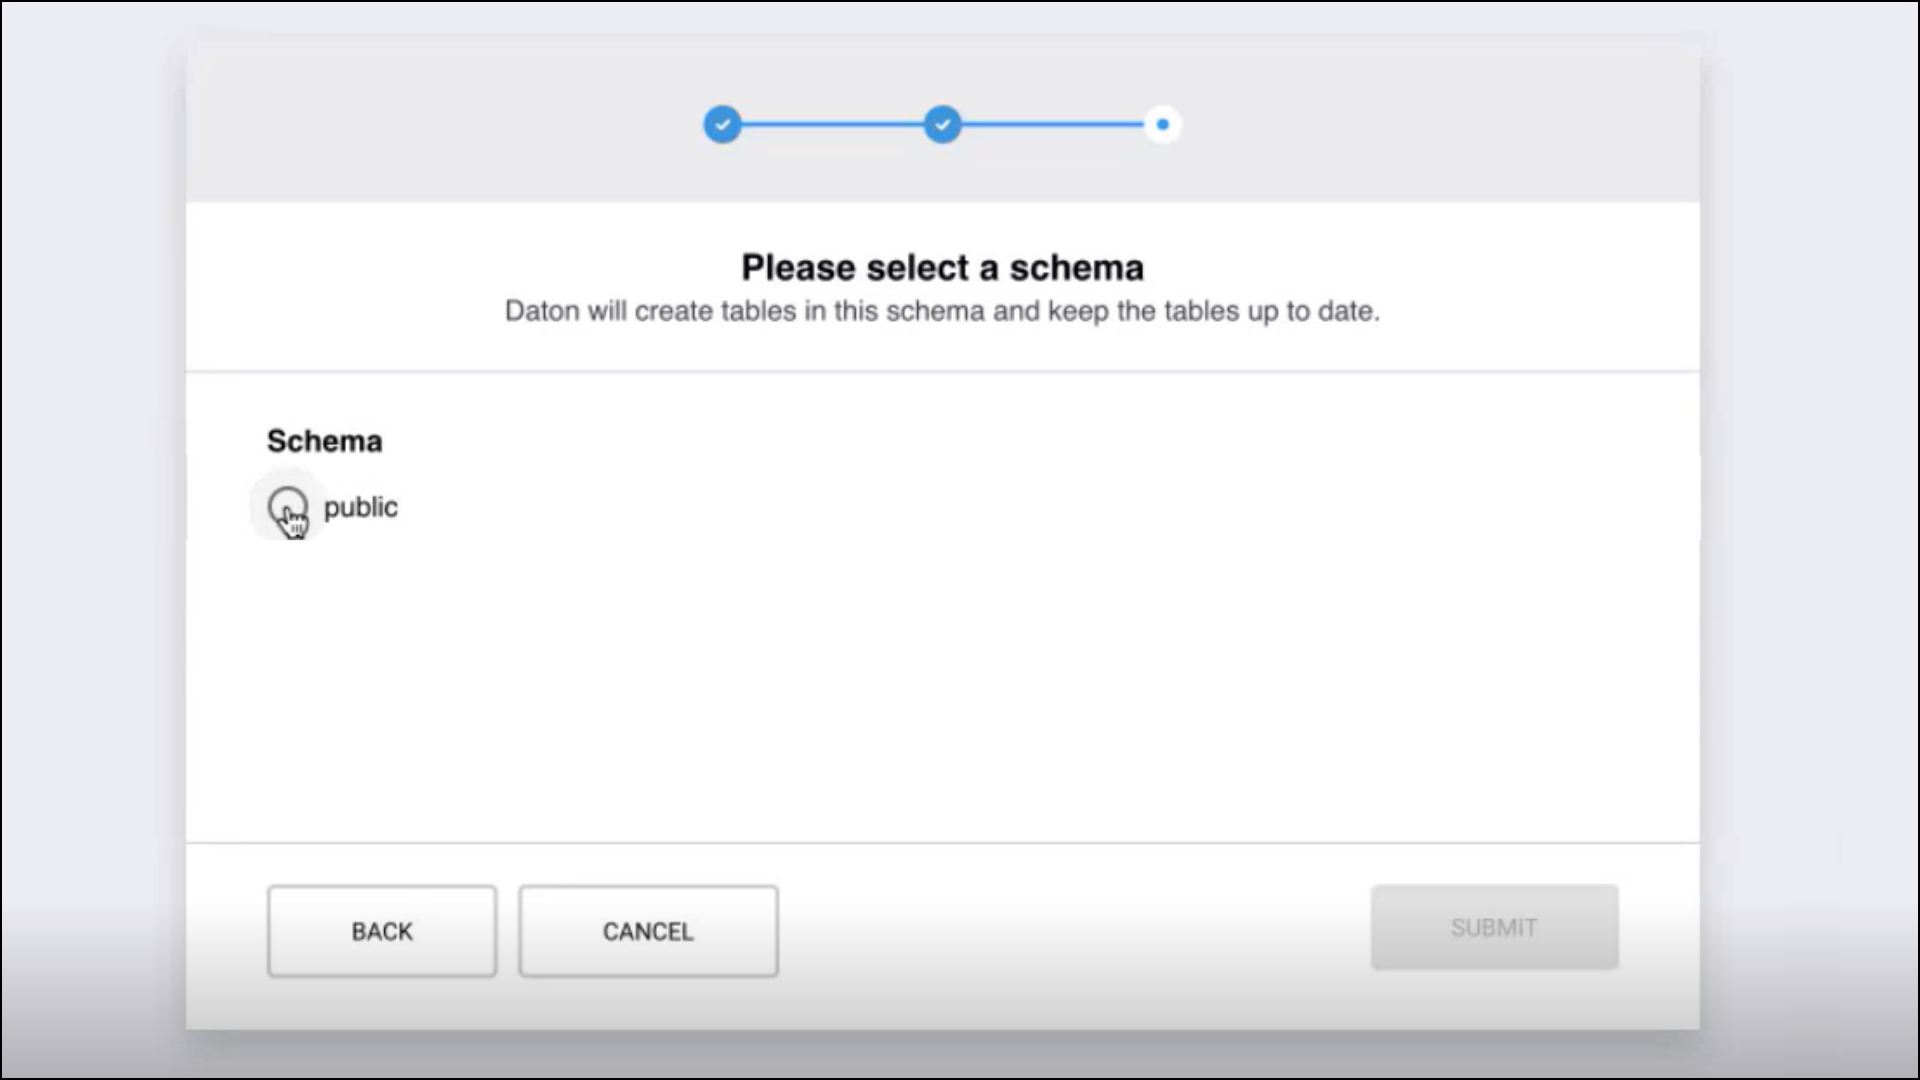
The MySQL database is now configured as a destination in Daton.
Note: Once the integration is complete, you can query your MySQL database in Daton to create additional schemas and tables as needed.